General Zod
TGT Addict
A lot of established knife-makers use the magnet method.
Yeah, I've watched several of Walter Sorrels' videos, and he uses a magnet every time he heat treats.


A lot of established knife-makers use the magnet method.
I have learned a lot from watching Walter Sorrel's videos.Yeah, I've watched several of Walter Sorrels' videos, and he uses a magnet every time he heat treats.
Between him, Black Bear Forge, Alec Steele and Purgatory Iron Works, I've picked up a lot of tips and techniques.I have learned a lot from watching Walter Sorrel's videos.
Red Beard Ops is a good one too. another couple of good ones I like are Koss amd Zeeman Knives.Between him, Black Bear Forge, Alec Steele and Purgatory Iron Works, I've picked up a lot of tips and techniques.
Red Beard Ops is a good one too. another couple of good ones I like are Koss amd Zeeman Knives.
They each have their own different styles and methods, but very informative. Koss and Zeeman mainly do stock removal method, but still lots of great info to learn from.I'll have to check them out.


zzzzlooking good so far. Very nice indeed. You know I'm jealous now!It. Is. HOT today. Well, humid as all hell anyway. Weather app claims it's only 91°...
Anyway, it's heat treating time. I fixed my bevels, then fucked them up, then mostly un-fucked them (lessons were learned) and got everything to about a 120 grit polish. Drilled holes for handle pins in the optimistic hope one of these might survive torture testing to become a finished knife.
View attachment 344956
Then I fired up the forge and heated the blades until they were non-magnetic...then heated them for a few more minutes before quenching them in canola oil. The quench seemed to go well - a file skates right across the steel instead of biting in.
View attachment 344959
You can see the oxidized finish the oil left on the blades. That needed to (mostly) go, because in the next step I'll need to be able to see if a tempering color appears on the steel. So, a bit of light sanding happened to get back to bare metal.
View attachment 344960
As you can see, not exactly the prettiest finish, but at this point it doesn't need to be. Right now I'm preheating the oven to 400° to temper the blades. That should be about a 5 hour process. So...hopefully tomorrow I can finish them up and get the edges sharpened to start some torture testing.
Hey, JRB, how's this look for post-termpering colors on 1075 (if you can even tell from a photo). I'm not sure what shade of "straw" I should be looking for.You have just 2 hours to fix any problems in your blade and have a handle ready to test......will it keel?????
We'll be waiting.
Sent from my SM-S906U using Tapatalk


I have no experience tempering knife blades, so I can't help you there.Hey, JRB, how's this look for post-termpering colors on 1075 (if you can even tell from a photo). I'm not sure what shade of "straw" I should be looking for. View attachment 345006
Oh yeah, overall, I do kind of like the one on the left. Not a bad shape at all for a skinning/capping/boning knife.
Sent from my SM-S906U using Tapatalk
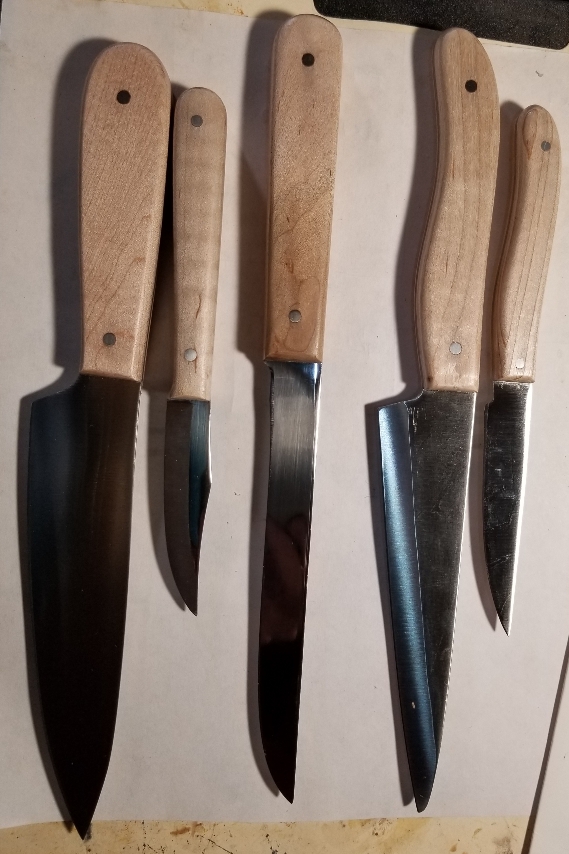
For just a general camp knife to have to cut something, those will work while standing up to some abuse. And that is great. The abrupt angles would be hard to get an edge for fine work and would create drag for other work. Like any other knife, the design means they have pros and cons. The handle shape is very similar to a line of kitchen knives I make. Very nice for delicate work. The ones on the right. Although for me, I generally prefer the ones on the right.
Sent from my SM-S906U using Tapatalk
Smartass...


