I usually shoot laying in the dirt but there is a rise at 200 yards that blocks the target when shooting from 300. After a couple attempts at movable benches I finally gave in and built a permanent one. Did it in a way that required the minimum number of tools, planning, and cost.
Total cost for me was $65, used some old cedar cross ties from power poles for the legs to save a little bit. Materials were 3 2x6x12', 1 sheet of 3/4" plywood, 1 bag of cement (you may need more, ground is hard as a rock out here), and 1lb of 3.5" wood screws.
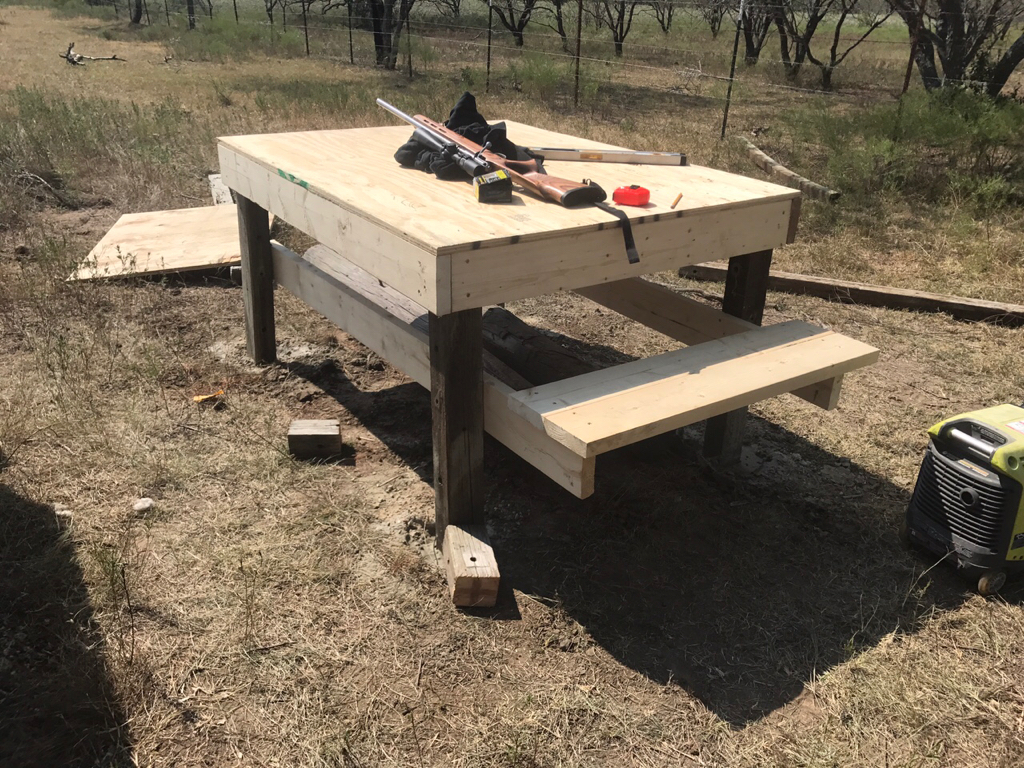
Table dimensions are 4'X5'. About 32" tall and the seat is 13" below table height. I've had a lot of trouble getting the seat height correct so I did a lot of sitting and measuring. 13" seems about right.
I drilled my holes about 10" deep. That are of the property is sand but it's packed so hard it's like drilling through sand stone. Had to soak with water, drill down an inch, and soak again. I recommend going deeper for softer ground. You want to set your posts 1.5" inside the final dimensions so after building the frame around you will be at the right size. To save setting up strings to mark your holes and keep it square you can cut the table top to size, lay it on the ground, mark the corners, and come inside those marks to place the hole. Remember to move inside so the post will not be set all the way in the corner.
I cut my 2x6 frame to length. The long sides are cut to 5', short sides cut to 45" so the corners come out flush. Then I set the post in the holes (no cement), estimated the final high on one corner on the bench end and marked it. Take a 2X6 that's cut for the frame, start a screw, get it close to the mark and put one screw in.
Now move to the other end, lay a level on the 2X6, hold the post up fairly straight, level the 2x6 and run the screw in. Is the board to line up your next 2X6, one screw, then level to the next leg. Repeat until you have the top framed by 2x6. Double check with a level on each side and adjust as needed. Legs should be close to level but it's not a big deal.
At this point you should have 4 post sitting in holes connected near the top by a level 2X6 frame. Measure diagonal across the corners to make sure it's square. If not shift one side and measure again until it's close enough for your standards. Once square, pour cement in the holes and leave it to cure.
Come back once cement is cured, mark the posts for cutting by running a pencil along the top of the 2X6. Pull the 2X6 off but make sure they don't get mixed up. You want to put them back in the same spot. Cut the tops of the posts at the marks. Reattach the 2X6. Double check level again if you're a perfectionist. Now add a couple more screws to each end of each board.
Now lay the plywood on top and screw it down. I like a screw every 18" or so.
Measure down 13" from the table top and mark the posts on the shooters end. Cut the last 2X6 in half. Hold it inside the legs and make sure there is enough coverage on the front leg to get a screw in. Line it up with the mark on the shooter end and put one screw in. Level it and put another screw in on the front leg. Repeat on the opposite side. Then add a couple more screws on each side at the shooters end.
With my dimensions I had two drops left over from the first two 2X6 that fit perfectly across the seat supports. I moved them back so a couple inches of the back board were hanging over to make it easier to get in/out of the seat. Lay them on the supports and sit at the bench to find where they're comfortable and screw then down.
Mostly done now. Take the extra screws and put them around the 2X6 frame and anywhere you think could use them.
And it's done. I'll probably set a post for the seat at some point to make it easier to get in/out. It will also need to be sealed. I used untreated lumber because the treated lumber I've dealt with recently has been way too green and warps really bad as it dries.
Total cost for me was $65, used some old cedar cross ties from power poles for the legs to save a little bit. Materials were 3 2x6x12', 1 sheet of 3/4" plywood, 1 bag of cement (you may need more, ground is hard as a rock out here), and 1lb of 3.5" wood screws.
Table dimensions are 4'X5'. About 32" tall and the seat is 13" below table height. I've had a lot of trouble getting the seat height correct so I did a lot of sitting and measuring. 13" seems about right.
I drilled my holes about 10" deep. That are of the property is sand but it's packed so hard it's like drilling through sand stone. Had to soak with water, drill down an inch, and soak again. I recommend going deeper for softer ground. You want to set your posts 1.5" inside the final dimensions so after building the frame around you will be at the right size. To save setting up strings to mark your holes and keep it square you can cut the table top to size, lay it on the ground, mark the corners, and come inside those marks to place the hole. Remember to move inside so the post will not be set all the way in the corner.
I cut my 2x6 frame to length. The long sides are cut to 5', short sides cut to 45" so the corners come out flush. Then I set the post in the holes (no cement), estimated the final high on one corner on the bench end and marked it. Take a 2X6 that's cut for the frame, start a screw, get it close to the mark and put one screw in.
Now move to the other end, lay a level on the 2X6, hold the post up fairly straight, level the 2x6 and run the screw in. Is the board to line up your next 2X6, one screw, then level to the next leg. Repeat until you have the top framed by 2x6. Double check with a level on each side and adjust as needed. Legs should be close to level but it's not a big deal.
At this point you should have 4 post sitting in holes connected near the top by a level 2X6 frame. Measure diagonal across the corners to make sure it's square. If not shift one side and measure again until it's close enough for your standards. Once square, pour cement in the holes and leave it to cure.
Come back once cement is cured, mark the posts for cutting by running a pencil along the top of the 2X6. Pull the 2X6 off but make sure they don't get mixed up. You want to put them back in the same spot. Cut the tops of the posts at the marks. Reattach the 2X6. Double check level again if you're a perfectionist. Now add a couple more screws to each end of each board.
Now lay the plywood on top and screw it down. I like a screw every 18" or so.
Measure down 13" from the table top and mark the posts on the shooters end. Cut the last 2X6 in half. Hold it inside the legs and make sure there is enough coverage on the front leg to get a screw in. Line it up with the mark on the shooter end and put one screw in. Level it and put another screw in on the front leg. Repeat on the opposite side. Then add a couple more screws on each side at the shooters end.
With my dimensions I had two drops left over from the first two 2X6 that fit perfectly across the seat supports. I moved them back so a couple inches of the back board were hanging over to make it easier to get in/out of the seat. Lay them on the supports and sit at the bench to find where they're comfortable and screw then down.
Mostly done now. Take the extra screws and put them around the 2X6 frame and anywhere you think could use them.
And it's done. I'll probably set a post for the seat at some point to make it easier to get in/out. It will also need to be sealed. I used untreated lumber because the treated lumber I've dealt with recently has been way too green and warps really bad as it dries.